| Mode | Description | FileType |
| Cine | Records an uncompressed video stream | .AVI |
| Time Lapse | Records a stream of equally timed frames which plays back faster than it was recorded. | .AVI |
| Stop-motion | Records a stream of manually timed frames, such as an animation sequence. | .AVI |
| Still | Takes photographs. | .BMP |
Filenames are by default automatically incremented after each capture.
To run this program you must have a camera connected to your computer and switched on. The first time the program runs a dialog is displayed to select your camera hardware. The same camera will be used on subsequent runs unless it is not available, or you deselect it in the Options Menu when the selection dialog will be shown again.
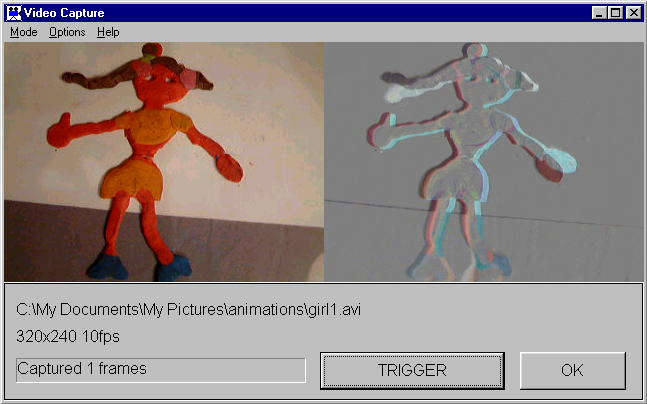
The control panel displays the current filename, format and capture status. The large button initially labelled START controls capture, and can also be activated by pressing the space bar or pressing the trigger (button 1) on a joystick or gamepad. The camera view image is scaled to 320x240 regardless of video format selected.
| Cine | This is conventional video recording .The START button begins video capture to the named file. Clicking this again (now labelled STOP) finishes capture and closes the file. The status bar indicates frame count, time elapsed and any frames dropped. The system will attempt to record (and play back) at the selected frame speed, subject to hardware capabilities. |
| Time Lapse | Time lapse photography produces speeded-up motion. It works in exactly the same way as video recording, and plays at the specified speed, but the recording rate is specified separately, and in seconds per frame rather than frames per second. |
| Stop Motion |
This mode is for animation, where each frame is triggered manually. The START button opens the named video file, and changes to TRIGGER. Clicking this (or pressing space or joystick trigger) captures one frame to the file. Clicking the OK button or pressing Enter or joystick button 2 closes the file. The status bar shows the frame count. The frame speed selected will be used when the file is played back by a suitable player.
In this mode, while recording, the right hand pane of the window shows a differential image which is useful for maintaining continuity during animation. Initailly the whole pane is mid grey. When any changes are made to the image, items added show in positive, and items subtracted show in negative. This can be used to check movements of animated objects, and continuity of stationary scenery. |
| Still | This uses the video camera to take a photograph, as a .BMP file. The main button is labelled TRIGGER. Clicking this captures an image, clicking it again discards the image. Clicking OK saves the image to the named file. |
| Video Source | sets any camera controls such a brightness or colour balance |
| Video Format | selects available image formats and any hardware compression. |
| Recording | Opens the Recording dialog to set filenames etc. |
| Reset Camera | Disconnects the current camera and closes the program. When the program is next run you will be asked to select a camera. |
The frame speed specified will be used for playback and will be requested from the camera in Cine mode, but the actual recorded speed may differ due to the hardware being unable to achieve the requested speed or the camera driver not offering variable speed.
If a frame is dropped by Windows, eg. due to the disk system being busy, then the preceding frame is shown twice and the correct timing is maintained. However Windows depends on the camera driver to supply frames at the specified rate, and if it fails to do so then the resulting file will simply play back at the wrong speed. The camera driver may also drop frames, which will not be reported by Windows.
The alternative is to allocate a fixed spool file to record to. Ideally the disk should be defragmented after the file has been created to maximise the available recording rate. The disadvantages are that at best half the available disk space can be used for recording, and that when the file is saved, it takes extra time to save the file to its final destination. This mode is most advantageous when used with post-recording compression, which is not supported by this program. The same effect can be achieved by directly recording to a pre-existing file and then using an editing utility to perform compression. The maximum spool file size that can be allocated by Video for Windows is 4Gb.
Enable spooling for Cine mode by checking the Spool box in Settings. Set the spool file location, size and name by clicking the Spool File button. In Frame mode recording is always directly to the destination file.